Showing posts with label Python. Show all posts

Saturday, April 13, 2013

RaspberryPi, Boblight, and the WS2801 LED - Follow up


(game isn't using boblight leds)

Had some time this weekend to follow up on some of the comments from my last post.

Gregory posted a link to this excellent tutorial. Allowing boblight and xbmc to run off the same pi.

cell phone camera doesn't capture the colors correctly but you get the idea:


Tuesday, March 5, 2013

RaspberryPi, Boblight, and the WS2801 LED - Part 3


Part 1 of my blog series went over our parts list and initial setup for this project. 

Part 2 dived into a little bit of code and making those LEDS light up for the first time.

This final part will go over installing Boblightd, XBMC boblight add-on,  mounting the LEDS and configuring them to look their best. 

If you followed Part 1 and 
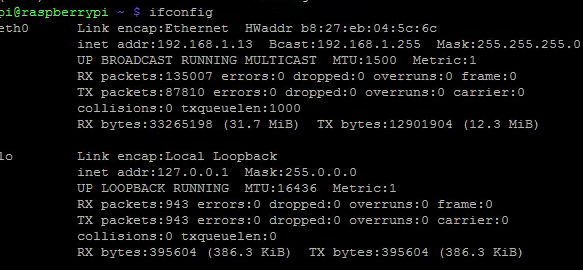
Part 2, you should know how to SSH into the raspberry pi. Make note of your raspberry pi IP Address we'll be using it soon.  Once logged in run the following commands to install boblight. 

copied from here.

3. Install subversion
  $ sudo apt-get install subversion
4. Clone boblight source
  $ cd ~
  $ svn checkout http://boblight.googlecode.com/svn/trunk/ boblight-read-only
5. Compile:
  $ cd boblight-read-only/
  $ ./configure --without-portaudio --without-x11 --without-libusb 
If everything goes well.....
  $ make
  $ sudo make install
6. now configure your setup, see conf/LPD8806.conf for examples and move .conf file to /etc/boblight.conf
  $ sudo cp conf/LPD8806.conf /etc/boblight.conf
7. you can test now by starting boblightd
  $ sudo boblightd
we have to run boblightd using sudo for SPI to work
8. if you like, you can add boblightd to /etc/rc.local for it to start on boot
  $ sudo nano /etc/rc.local
and add
  /usr/local/bin/boblightd -f
before exit

Once Boblight is installed open up XBMC and go to 
  1. Settings
  2. Add-ons
  3. Get add-ons
  4. XBMC.org Add-ons
  5. Services
  6. XBMC Boblight
  7. Install

At this point you should be able to configure the boblight addon on XBMC. If you open the addon settings it should ask for an ip address. Type in your raspberry pi ip and hit ok.   If you restart XBMC and everything went correctly...the LEDS will light up RED, GREEN, BLUE and either turn off or go to the ambient color configured in the settings. 

We're almost there! We still need to configure boblightd for the amount and orientation of theLEDS. You can do this manually or you can use a program somebody wrote for this purpose. 


This will spit out our boblight.conf file. You'll need to edit this before copying to the raspberry pi.

Boblight is normally used with an arduino connected by usb so thats the output/interface by default you should just need to change the output and the interface.

/dev/spidev0.0 is the output needed for the pi to communicate with the LEDS
The interface needs to be changed to the raspberry pis ip address.

The beginning of my boblight.conf:
[global]
interface  192.168.1.13
port      19333
[device]
name            ambilight
type            momo
output          /dev/spidev0.0
channels        150
interval        20000
rate            115200
debug           off


This was kind of a pain to copy to the raspberry pi. Especially through command line.

Easiest way I found is to COPY the entire boblight.conf and create a new file

 sudo nano boblightd.conf


 and then PASTE the config into it. 

and finally copy that file over your boblight.conf file

sudo cp boblightd.conf /etc/boblight.conf


Thats it! If everything went well boblight shoudl be configured. Every time you start up XBMC on your pc it should look for the the raspberry pi ip address and connect.
Mounting the LEDS


The picture above is my preliminary OMG I NEED THESE LEDS ON MY TV NOW. I just stuck them on there with some painters tape. Worked for a bit until the tv heated up and melted the sticky. 

Once I got them stickied on there I created a test video for XBMC to play. I just went into mspaint and created a quick picture w/ a different color on each side and rendered that as an avi in Windows Movie Maker. Took about 15mins but it helped significantly when determining the leds were in the correct position. 

In the picture below you can see my monitor in the background corresponding with the LED Colors around the tv. 


Once we figured out how the LEDS were going to be laid out I cut up my TV Box for a large chunk of cardboard.

I've seen some much better implementations for an LED mount but i'm cheap and lazy.


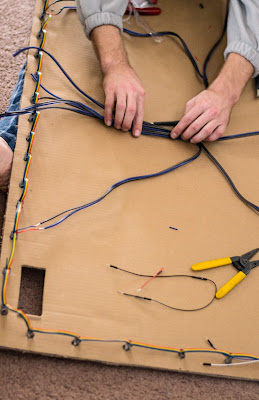
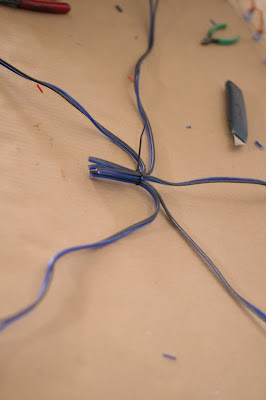
This picture and the one below show our power distribution for the LEDS something we probably didn't need to do with the amount of LEDS that we used (50). We noticed some drop off in brightness so we decided to do it anyways. 


Notes: I'm still working on this project. Right now I have two Raspberry pis one to control the LEDS and one to run XBMC...unfortunately I haven't had the time to go through some of the forum posts regarding RaspBMC + Boblight addon. It seems somebody out there has gotten XBMC on the raspberry pi to talk with boblight using omxplayer. I'll do a follow up post once I figure it out and get it workin. For right now using my windows pc connected to the TV works out great. 


Wednesday, February 20, 2013

RaspberryPi, Boblight, and the WS2801 LED - Part 2


For the most part this tutorial follows the instructions outlined here.  
This is part 2 of my Raspberry Pi and WS2801 LED post. Part one went over the preparation and parts needed to make the LEDS and Raspberry Pi talk to each other. Part 2 will focus on putting everything together and capitalizing on  that communication.

We used a breadboard when we were prototyping the power and data connections between the RaspberryPi  and the LEDS. According to the diagram below our power is coming from an external 5V source (not from the RaspberryPis  micro usb) this is needed to properly power the LEDS.


I did a lot of scavenging and found a 5v 3amp power supply for the LEDS and the RaspberryPi. We actually had some success powering the RaspberryPi and the LEDS through USB but found that the last LEDS in the strand were a bit dimmer. In the final build we distributed the power every 10 LEDS but i'll discuss that in a later post. 

The power supply is connected into this which is then connected to the breadboard via jumper cables.
The pictures below are from our initial setup.


raspberry pi ws2801 power
We didn't use the breadboard in our final version, it was just an easy way of distributing the power and data connections without stripping cables. 

Once the LEDS are connected it's time to run some software to see if everything works correctly. 
If you followed part one of this tutorial you should have the Adafruit WebIDE installed and running at this point. We'll use this to test our LEDS. 

I had some trouble with the local name that the you're supposed to be able to access the IDE from . 
http://raspberrypi.local:3000 according to the tutorial. My local network couldn't resolve the name, but it had no trouble accessing the IDE via IP. So navigate your browser to http://YOUR-RPi-IPADDRESS:3000

If all went well you'll be greeted with this page:


The IDE requires you to sign up for a BitBucket account. Which will privately hold your code (unless you want it public) in their cloud. This worked out pretty well for me since i had to install the WebIDE a few times for it to work correctly. I wrote some custom scripts which were saved between installs on my BitBucket account. 

Once signed in navigate through the examples to Adafruit_LEDPixels.py:


The arrow in the picture point out:

SPICLK = 18
SPIDO = 17

These are the pins that the Pi is going to send data to when this python script is run.
This post here explains why were using these pins on the RaspberryPi. 

If everything looks like its in the right spot hit the 'Run' button up top. If it worked you'll see the LEDS light up RED, GREEN,  BLUE, then cycle through a spectrum of colors. 

I sat and screwed around with the python scripts for a bit once I hit this point. With some fairly simple changes you can do some cool stuff with the LEDS from this point. Heres a quick script I wrote to check your gmail for the subject ALARM.


 #!/usr/bin/env python  

 import RPi.GPIO as GPIO, feedparser, time  

 import thread  

 DEBUG = 1  

 SPICLK = 18  

 SPIDO = 17  

 ledpixels = [0] * 40  

 GPIO.setmode(GPIO.BCM)  

 USERNAME = "GMAILUSER"    

 PASSWORD = "GMAILPASS"     

 NEWMAIL_OFFSET = 1      

 MAIL_CHECK_FREQ = 60   

 def Color(r, g, b):  

      return ((r & 0xFF) << 16) | ((g & 0xFF) << 8) | (b & 0xFF)  

 #Colors  

 RED = Color(255, 0, 0)  

 BLUE = Color(0, 0, 255)  

 GREEN = Color(0, 255, 0)  

 ORANGE = Color(177, 53, 47)  

 OFF = Color(0, 0, 0)  

 colors = []  

 allfalse = False  

 def writestrip(pixels):  

      spidev = file("/dev/spidev0.0", "w")  

      for i in range(len(pixels)):  

           spidev.write(chr((pixels[i]>>16) & 0xFF))  

           spidev.write(chr((pixels[i]>>8) & 0xFF))  

           spidev.write(chr(pixels[i] & 0xFF))  

      spidev.close()  

      #time.sleep(0.002)  

 def setpixelcolor(pixels, n, c):  

      if (n >= len(pixels)):  

           return  

      pixels[n] = c  

 def alert(color, delay):                                                                                                                                                                                                                                                                                                                                                                                                                                                                                                                                  

      for i in range(len(ledpixels)):  

           setpixelcolor(ledpixels, i, color)  

           writestrip(ledpixels)  

      time.sleep(delay)       

 def multiColor(colors):  

      b = 0  

      for i in range(len(ledpixels)):  

           setpixelcolor(ledpixels, i, colors[b])  

           writestrip(ledpixels)  

           time.sleep(delay)  

           b = b + 1  

           if(b >= len(colors)):  

                b = 0  

 def loopColors(status, colors):  

      if(status == True):  

           print("new thread")  

           for a in range(len(colors)):  

                alert(colors[a], .5)  

                time.sleep(.5)  

      else:  

           alert(OFF,5)  

 class Emailees:  

      def __init__(self, email, hasEmail, color):  

           self.email = email  

           self.hasEmail = hasEmail  

           self.color = color  

 def emailAlarmCheck(delay):  

      allmails = feedparser.parse("https://" + USERNAME + ":" + PASSWORD +"@mail.google.com/gmail/feed/atom")  

      alarm = Emailees("ALARM", False, RED)  

      for i in range(len(allmails.entries)):  

           if(allmails.entries[i].title == alarm.email):  

                alarm.hasEmail = True  

                colors.append(RED)  

                print("Found ALARM")  

      allfalse = [alarm.hasEmail]  

      loopColors(allfalse, colors)  

      print(len(allmails.entries))  

      time.sleep(1)  

 while True:  

      emailAlarmCheck(.5)       

  ##  


Congratulations! If you made it this far you're only one step away from playing your movies with dynamic LEDS. My next and final part will cover Boblight, XBMC addons, Adalight, and attaching your lights to some sort of structure.


Monday, February 4, 2013

RaspberryPi, Boblight, and the WS2801 LED


raspberry pi ws2801 breadboard configuration taken in the midst of testing a bunch of things. it's a lot more cleaned up now.

A couple months ago I was looking for a project to start for my new Raspberry Pi. As soon as I saw the video after the jump I knew what had to be done.


Backlights! for your TV. This experience is only offered on some pricey high end phillips tvs that don't seem to be available in America., it's also available to us tinkerers for less than $125.

I'm currently on Windows 8, so if you're running Linux or Mac you'll need to substitute certain programs out like PuTTY for SSH.


Software:


Hardware:

  • WS2801 LED Strand (50pc) or more
  • 5-Port Switch
  • 5v 3amp(min) DC Power Supply
  • 4Gb Class 10 SD Card
  • Raspberry Pi
  • Breadboard
  • Male to Female .1" 2.43'mm Jumper Cables 
  • Wire Cutters
  • Electrical Tape
  • Zip Ties
  • Multimeter 
  • (optional) 5v MicroUSB Power
  • (optional) HDMI to VGA adapter


Download the latest image of Occidentalis and install it onto our Raspberry Pi. This OS doesn't necessarily need to be used but it will make things easier. With this image the Pi can be powered on by the GPIO pins, which will be required later, it also contains some of the packages required by boblight to communicate with those pins.


Connect the Ethernet Cable, SD Card, and lastly the MicroUSB power to the Pi.
If the OS was installed correctly this should start the boot process.

NOTE: This is a headless OS. Meaning there is no GUI by default. Our intention is to turn the machine on and "use it" over the network from your main PC. There will be no monitors or TVs attached to the raspberry pi driving the lights. 


Once Occidentalis is installed we'll need to SSH into the Pi and configure it. (Assuming you're connected to the network via ethernet)

This can be done fairly easily if you have a keyboard connected to the Pi log in with the default login. Otherwise I will usually logon to my router to check connected devices.

User: pi
Password: raspberry

ifconfig

you'll notice inet addr: 192.168.1.13
this is your Pi's IP Address.


If we open up PuTTY we'll be able to connect to the address above.


I've made it a habit to immediately run updates/upgrades

sudo apt-get install update
sudo apt-get install upgrade

Our next step is installing the adafruit Raspberry Pi WebIDE
paste the following command:

curl https://raw.github.com/adafruit/Adafruit-WebIDE/alpha/scripts/install.sh | sudo sh

Go grab a beer and wait for the install script to finish.


Once completed you'll be able to access http://raspberrypi.local and your Raspberry Pi is now fully prepared to program LEDS from a browser!

In Part 2 we'll talk about power distribution, light painting, breadboards, and we'll connect those LEDS!